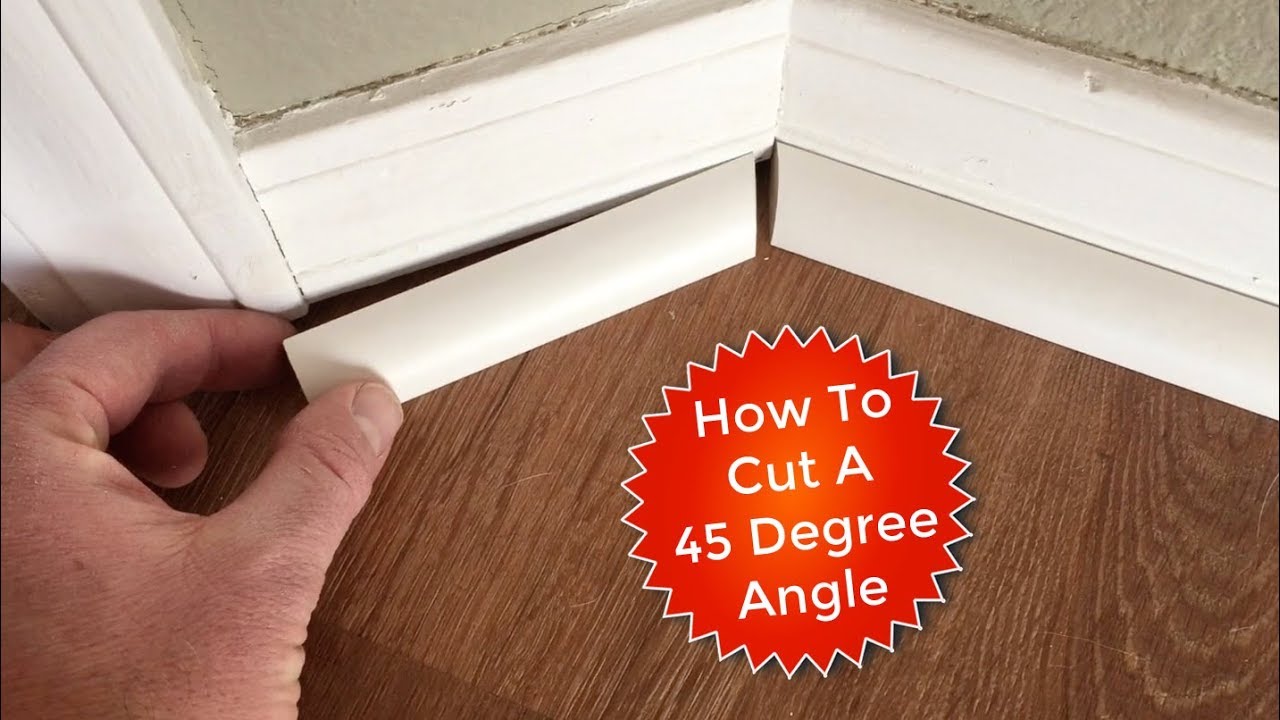
how to cut angles for trim
Therefore 180 120 60. Do the same steps with the next trim that is to be attached to.

Great Tip A Really Easy Way To Figure Out Tricky Angles When You Re Installing Moldings Trim Diy Home Improvement Moldings And Trim Home Improvement Projects
Next place the trim against the fence so that the top of the trim is in contact with the fence.

. Then I fold it in half with the wall edges of the paper lined up with each other. Using a Piece of Paper. Then position the trim to the right of the saw. Place the trim on the mark in such a way that it is positioned the same as it will be when placed on the wall.
Remove the baseboard pieces. We now have a trim cut with an angle of 120 degrees. Before nailing it in place mark the second piece the same way and test for fitting. Set the miter saw to cut at a 45-degree angle.
Swing the blade of the miter saw 45 degrees to the left and place the first piece of the trim upside down on the saw with the scrap end to the right. The saw can be adjusted to cut at any angleset it to 45 degrees for one side of a standard 90-degree corner. Use 1-14 or 1-12 brads to close the corner. Check it with the corner.
Cut the 45 -degree angle on both sides from the short to short direction. How do you cut trim around a corner. Put the two pieces on the drawing and place them parallel to each other. X is divided by 2 and the angle setting for your miter saw.
Turn off the miter saw. Cut test pieces using scrap wood and check the angle using the bevel square. Do same for left side but swing the blade over to the left for an inside-out cut. For 180 degrees corner the trim angle is X.
For a perfect 90 degree corner you are going to be making a 45 degree cut for the trim. Cut a 45-degree angle in a piece of trim with a miter saw. Cut with the blade on the right 45-degree angle. Lay the piece of paper on the work surface.
Then position the trim to the right of the saw. Examine the miter angle. For example the trim angle is 120 degrees. Swing the miter saw blade to the left or right or swivel a miter gauge on a table saw to the left or right in the direction needed to match the angle on the bevel square.
Create an identical cut on the other wood piece applying the same angle but reverse to either the left and right. How do you cut inside corners for trim. Cut the right side. Youll need to cut each piece of trim at a 45 angle so that when the two pieces butt together theyll create the perfect 90 angle you need to create a polished look.
Using a power miter saw is the best way to cut crown moulding angles. Lock the blade at the angle and make the cut. Measuring tapes end hook eases measuring. Fold the paper again.
Turn the folded paper upside down. Fine-tune the blade one or 2 at a time and cut your. The saw can be set to 45 degrees to the left or 45 degrees to the right. Then place the paper on the miter saw with wall edge against the saw fence and adjust the angle for your cut to match the folded edge of you template.
For An Output Angle Cut. Cut the proper amount of molding with help from an experienced foreman in. Turn the angle gauge clockwise until it is oriented to the left hand 45-degree angle setting. Cut the outside corner angle by.
So your first step is to set the saw to 45. Cutting base trim angles. Then position the trim to the right of the. Turn the angle gauge clockwise until it is oriented to the left hand 45-degree angle setting.
Measuring and Cutting the other Molding. Miter saws allow you to create angles for any molding you need for house projects. Instead lay the trim piece along a 1-by board with its end even with the end of the 1-by and hook the tape to the 1-by instead. Cut a 45-degree angle in a piece of trim with a miter saw.
And then cut the piece a little long so you still have the option to shave a little from the angle if it doesnt fit. If there are spaces on the outer part of the angle it will be too shallow. Repeat the process one more time so that you have two pieces of baseboard with a 30-degree miter cut. Step by Step Process of How to Cut Trim at a 45 Degree Angle Without a Miter Saw.
Turn on the miter saw and cut the baseboard. Turn the angle gauge clockwise until it is oriented to the left hand 45-degree angle setting. If a piece is cut at an angle on the end you are not cutting it will be difficult to hook the tape measure to it. Since gaps on the back side of the corner are barely noticeable while gaps on the front are glaring its a good idea to start by cutting slightly steeper 45-12 degree angles first.
Using the filer or sander smoothen the cut angles if required. Now measure the distance between the lower corner of. Turn on the saw and cut the trim with the other hand. Measure up the right side of the door to the bottom of the 45-degree angle cut on the top trim.
Hold the trim tight against the fence and the top of the saw with one hand. Cut a 45-degree angle in a piece of trim with a miter saw. Using a miter box or a power miter saw cut the baseboard at a 45-degree angle. If the required cut is a 90-degree outside angle align the trim inside the box with the right edge just past the 45-degree outside cut slot.
Finding the angle Align the piece at the correct height above the piece of siding below it already installed and side the right angle towards the gable end until the top corner of the siding touches the gable. If there are some spaces on the inside the angle may be too sharp. There are two formulas that you can apply to get an output angle cut. Position the blade a couple of inches above the molding turn it on and start to cut by pushing it down gently but firmly.
Cut all the way through the trim to create the corner angle. Cut all the way through the trim to create the corner angle. I use paper to get the shape of the corner. Test pieces may seem like extra work but they can save you money because you wont waste your good.
How do you trim a tree without killing it. You can use anyone because both give you the same result. What angle should trim be cut at. The trim should be at a slight angle tilted away from you.
When you encounter the doorway measure the distance between the door casing and the wall. Reverse the blade and cut the opposite angle on the opposing piece of trim in the same manner. Then if theres still a gap in the front cut a slightly steeper angle on both pieces.
Pin By Krista Seyffert On I M Fix N It How To S Such Diy Home Improvement Woodworking Tips Home Repairs

Finding The Correct Moulding Angles At An Irregular Corner Moldings And Trim Woodworking Tips Remodel

Pin On Beginner Remodeling Tips

Finding The Correct Moulding Angles At An Irregular Corner Moldings And Trim Diy Home Improvement Woodworking

Pin On The Home Designs

Pin On Ideas For The House

How To Figure Out Angle Of L Shaped Top With Two Different Width Boards Diy Outdoor Furniture Easy Woodworking Projects Woodworking Tips
Pin On New Home Decor Ideas


Comments
Post a Comment